- Home
- >
- Help Center
- >
- Website Management
- >
- Your Website - Getting Started Instructions
Your Website - Getting Started Instructions
After your website design has been completed by our designers and our developers, we turn the project over to you. The pages and navigation will be built out according to the design and feedback in the ticket. Here are instructions and videos on using the 3plains content management system and the different tools. Before logging in and getting started, here is a brief explanation of our 3plains Portal and what is what.
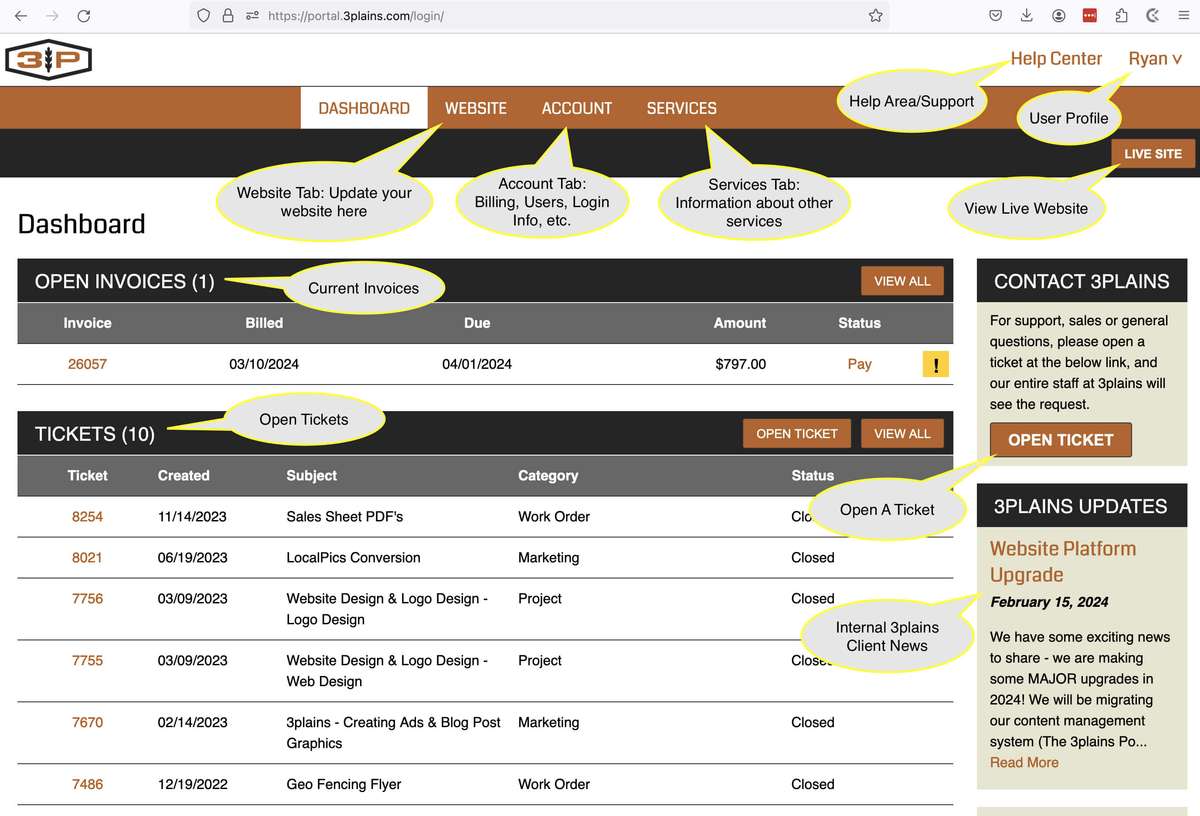
3plains Portal Overview
All of these 3plains tools are accessible in your 3plains Portal or 3plains Account. It's recommended you bookmark the 3plains Portal Link: https://portal.3plains.com/login/ Here are a few common functions within the 3plains Portal.
How to Add A Ticket - For questions/sales/support and how to contact 3plains, please open a ticket, that way our entire staff see your message and we can route it to the correct 3plains team member. Read More
Updating your Credit Card - To add a card on file. Read More
Getting Started
We recommend getting started on your website in this order:
- Upload Photos
- Edit Pages
- Edit Navigation Links (Tabs)
- Uploading Files
- Header/Slideshow Photos
- Adding Video
- Updating Settings
- Website Updates: Design vs Content
- Adding Links/Sponsors
1. Upload Photos
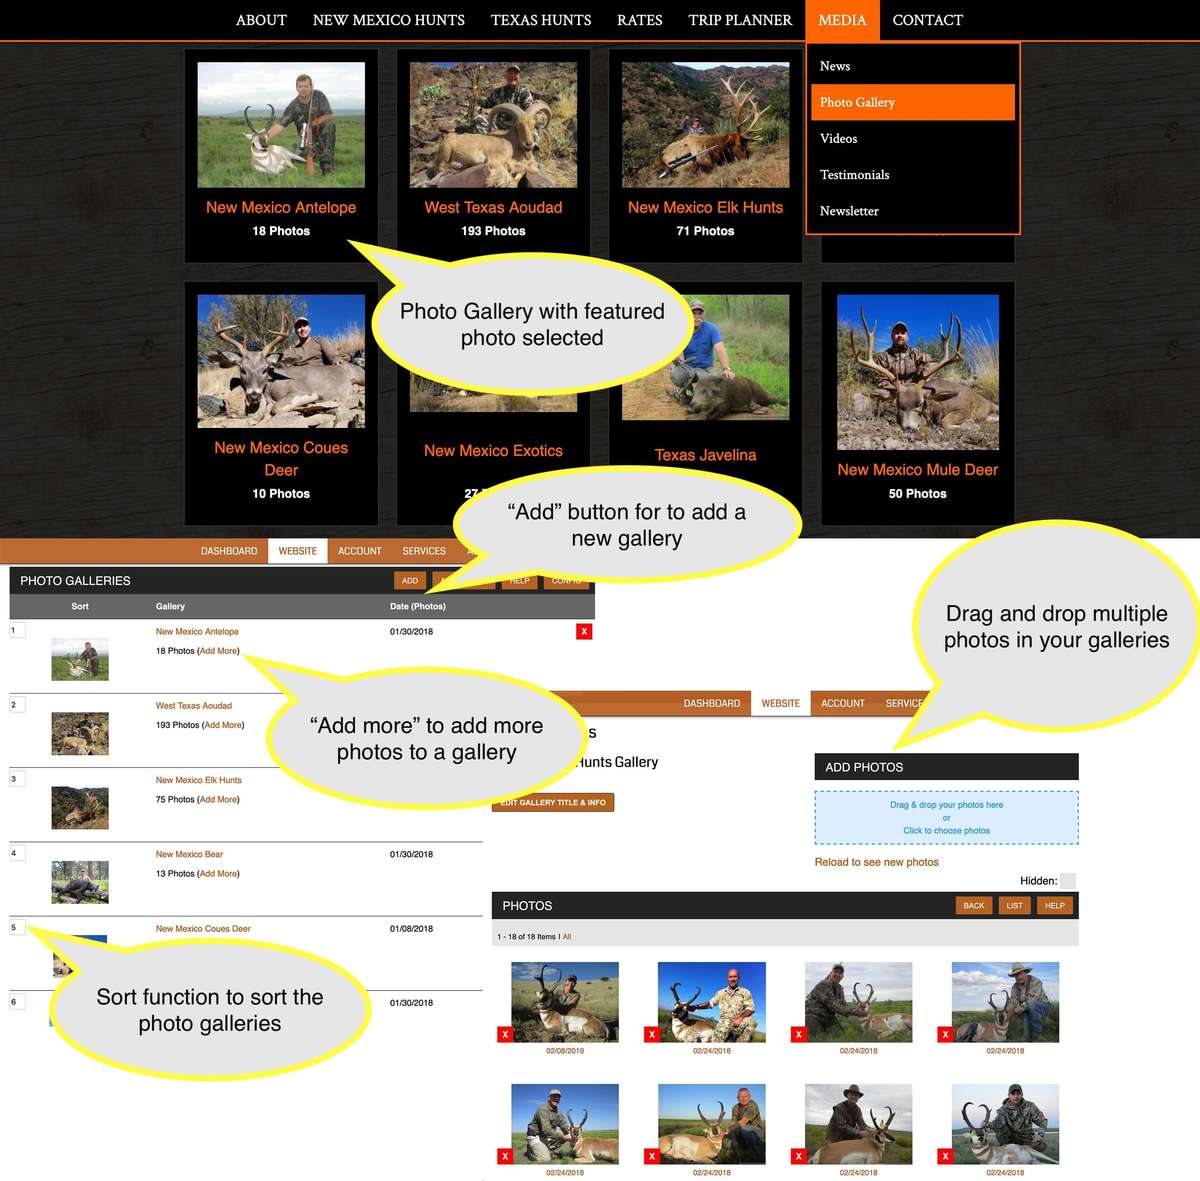
Before editing anything on your website, we highly recommend you upload all your photos onto your website first. You can upload photos from your computer or your mobile phone. Instructions:
- In the 3plains Portal when you are logged in, in the orange navigation bar go to: Website > Photos
- The system preloads photos for you
- Content Photos - You will see this is grey, that means it's hidden from the website. If you want to upload a photo to your website but not show it on a "photo gallery" on your website, just upload the photo(s) in the "Content Photos" gallery.
- Sample Photo Gallery 1 - You can edit this and make this whatever gallery name you want
- Sample Photo Gallery 2 - You can edit this and make this whatever gallery name you want
- Figure out what photo galleries you want setup. Here are a few examples for you:
- You can organize photo galleries by category like Big Rim Outfitters
- You can also organize photo galleries by year and category like Mackin Outfitting
2. Edit Pages
After all your photos are loaded, we then recommend moving on to editing your pages.
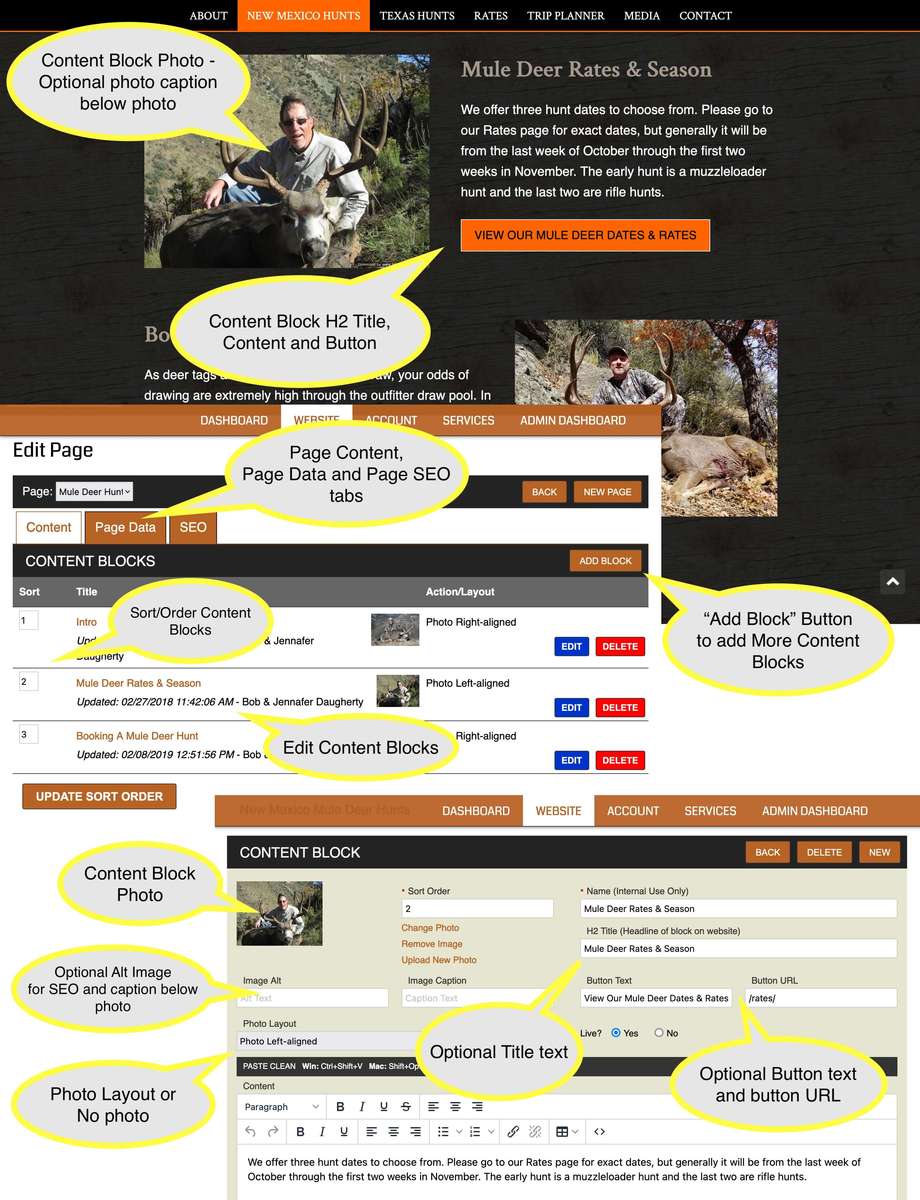
- In the 3plains Portal when you are logged in, in the orange navigation bar go to: Website > Pages
- To Update A Page: Click the Page you would like to edit, scroll to the bottom of that page to the area called "Content Blocks". Click the name of the block you would like to edit or click ADD to add a new content block, Hit Save
- Name (Internal Use Only) - A name for internal use only
- Title - Title for the content block (optional)
- Button Text - Button text (Optional)
- Button URL - Button url link (Optional)
- Content - text
- Photo - If you want to include on you can click Change Photo, Remove Photo or Upload New Photo
- Sort Order - You can sort here or the previous page
- Image Alt - Alt Text is for SEO/Marketing
- Image Caption - Caption will appear below the photo
- Photo Layout - You can have text only, align the photo right/left (Note, your logo will show by default if no photo is selected)
- Live? Yes/No - You can hide the content block if you chose too
3. Edit Navigation Links (Tabs)
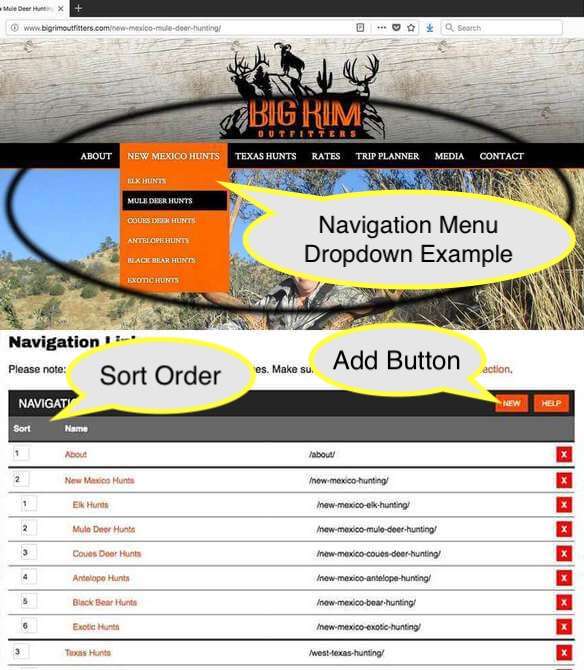
Navigation links can be a bit quirky and we are currently in production of our new system. Please let us know if you have any questions via a support ticket and we are happy to help. To edit navigation links, follow these instructions:
- In the 3plains Portal when you are logged in, in the orange navigation bar go to: Website > Navigation
- Add/Edit - Click on the title of the navigation link you want to edit and you can edit the title, url, parent page or sort order
- Title: Name
- URL: This will need to match the url of the page you have created in the Website > Pages area
- Parent Page: If you want a link to show up as a dropdown menu under another link
- Sort Order: How you want your links organized
- Title Replacement Text: No longer used at this time
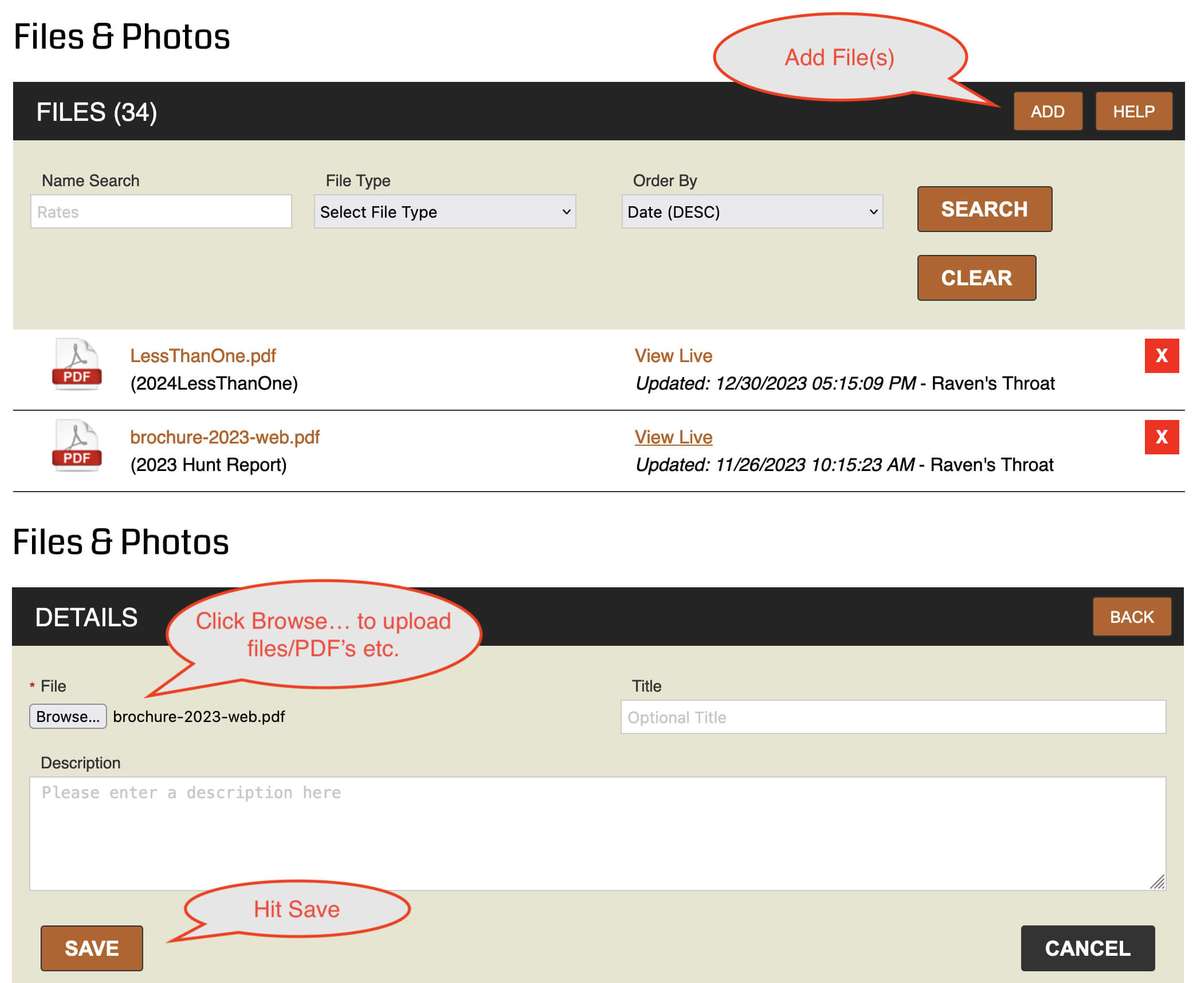
4. Uploading Files
How to upload a PDF documents, Word documents, Excel file or any other files and how to link to the files you upload.
How to upload a file:
- Navigate to Website > Files
- Click the Orange "Add" Button.
- Click the "Browse..." button to upload the file (the other fields are optional)
- Click "Save" (with big files, give it a moment)
How to link to a file:
- After the file is uploaded, click into it to get the URL, it will be listed under the name of the file. See example below:
- Copy the URL for file you would like to link (example from above, the URL is: https://www.3plains.com/uploads/files/3plains-3P-Icon.pdf)
- Now navigate to the specific page (Website > Pages area) you would like the file to be linked to
- Open/Create the Content Block you would like the link in.
- Give the link a title in the BUTTON TITLE box and then paste the link URL in the BUTTON URL box.
- Click save and you will be all set
Note, if the link is not working, check to make sure the link is copied exactly and there is not an extra space behind or in front of the link
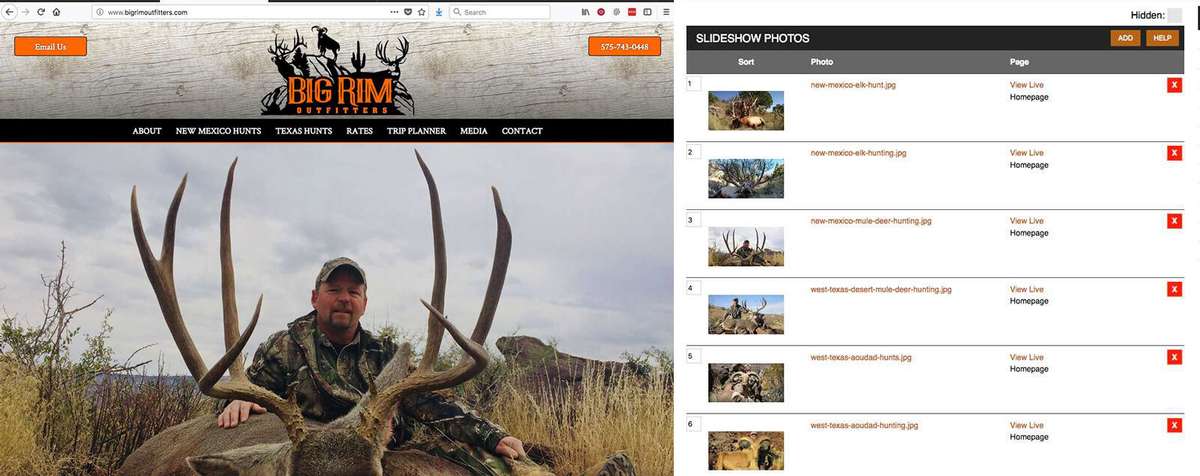
5. Edit Slideshow/Header Photos
How to upload files to your homepage slideshow, header photos and how to properly size them
Go to Website > Header & Slideshow
Using proper photos - Read More
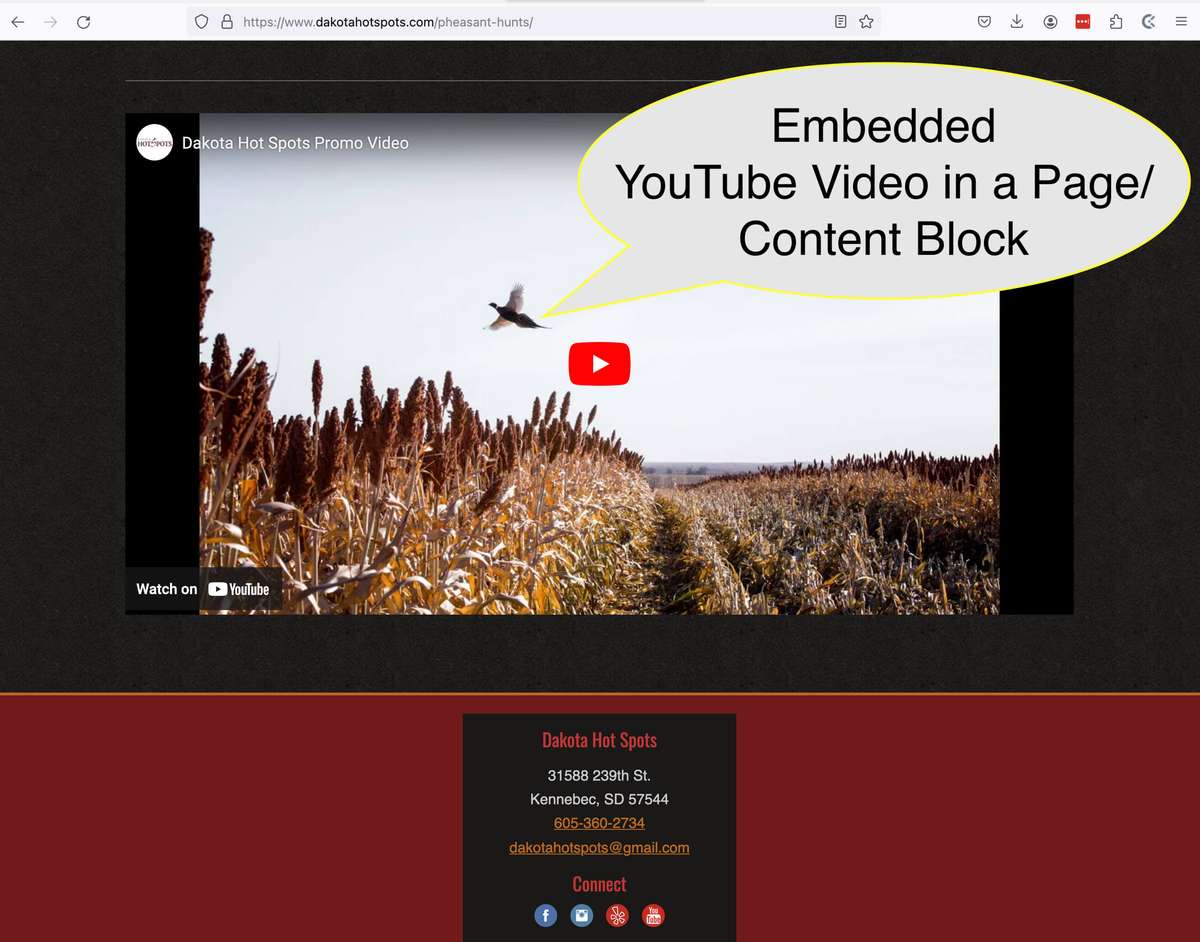
7. Updating Settings
Your social links on your website we already programmed into your website footer and possibly in the header if you requested it. When you add a new Icon and Link you will see the icon show up. If it doesn't show up as requested, please contact us via support ticket or any other social icons we may be missing.
To Add A Social Media Icon:
- Social Icon 1-7 - Select Facebook
- Social Link 1-7 - Paste in the url of your Facebook (Ex url Example: https://www.facebook.com/3plains/)
- Hit Save at the bottom of the page
To Remove A Social Media Icon:
- Social Icon 1-7 - Choose None Selected
- Social Link 1-7 - Delete link
- Hit Save at the bottom of the page
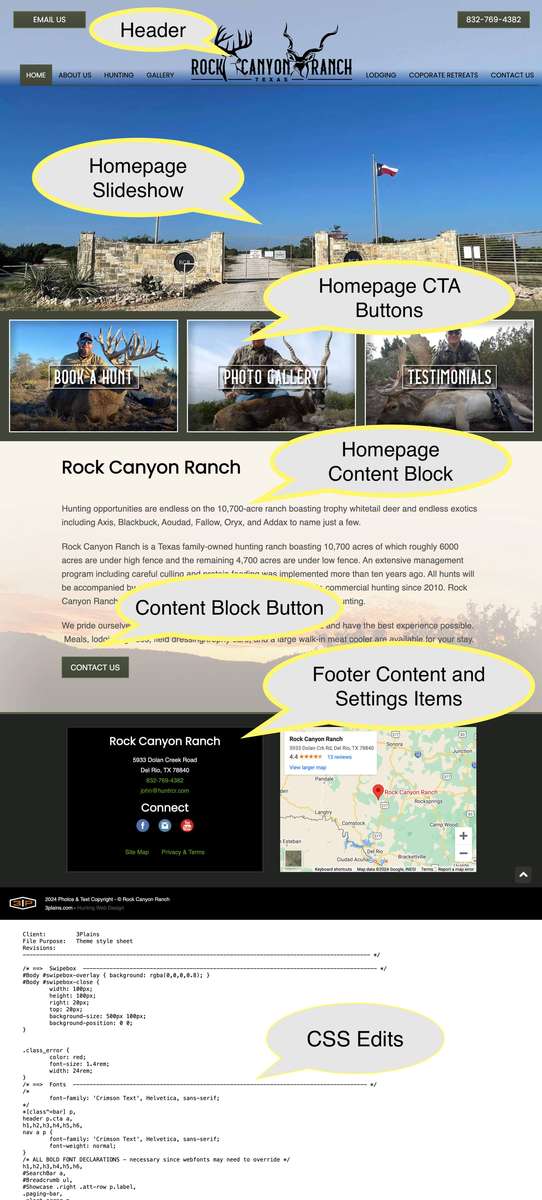
8. Website Updates: Design vs. Content
What can you update on your website want can't you?
Content Edits
- Pages - You can add/update/delete any pages you want. You can build out as many as you want.
- Photos - You are able to add photos, switch photos out within your website.
- Navigation - You are able to edit the entire navigation
- Videos -
- Homepage Slideshow -
Design Edits
Design edits will need to be handled by our 3plains team and you will need to fill out a ticket if you would like to update them.
- Styles - Styles are controlled in a CSS style sheets within your website (Examples: Platform and Theme). These styles can be edited by our developer.
- Font Colors/Sizes/Type - Fonts are contained in the style sheets within your website. Here is important information about changing web fonts.
- Moving Design Elements - This goes for
- CTA Buttons (Call to Action) - On the front page of your website/homepage, you might have CTA buttons or your website may not.
- Header - Depending on your website, you may have custom elements or you may not.
- Footer - In the footer, you probably have contact information, address, etc. You may also have a map, more links and social links. Most of this is handled in Website > Settings and some is put in by our developers. You will need to fill out a ticket if you would like some of these custom items updated.
- Code Updates - If you have code you need added to your header or footer that you generated from another source, currently, you can't add this. We have to add it for you.
A lot of these design edits will be accessible later in 2024 as we build out our new platform.
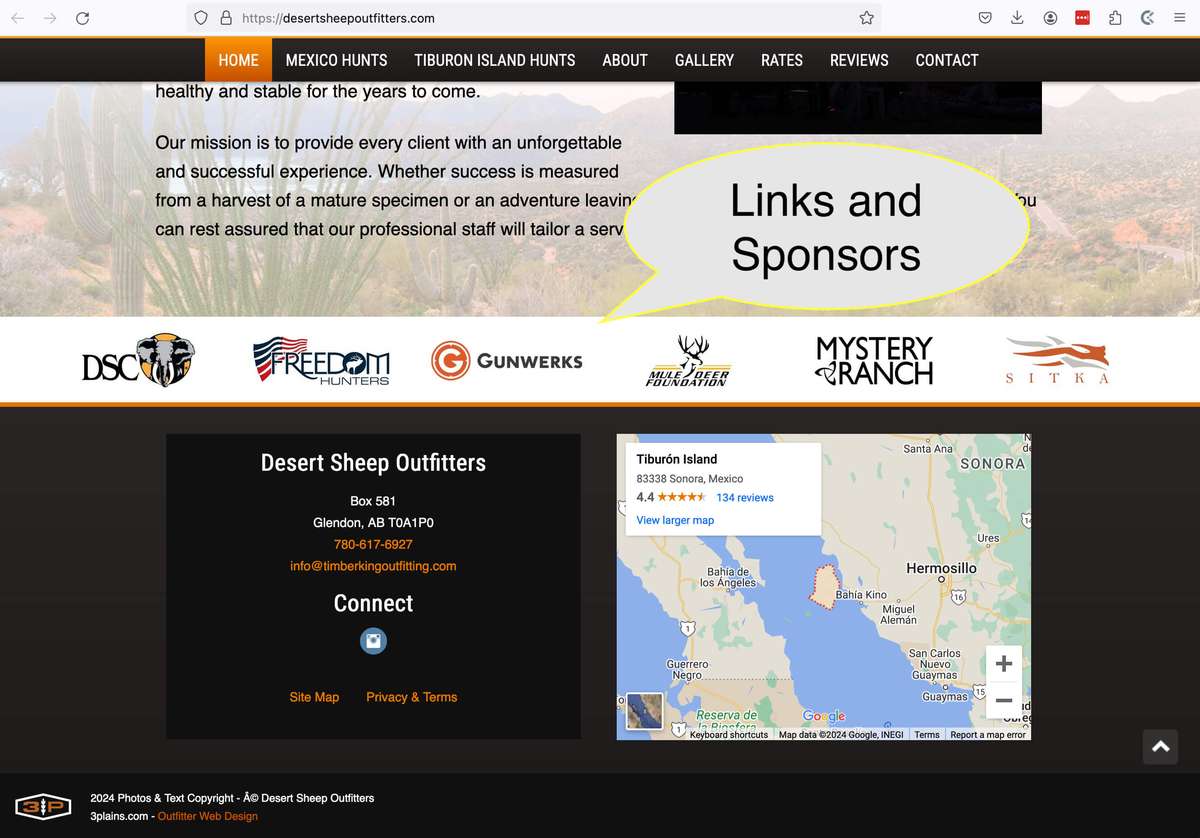
9. Add/Edit Links or Sponsors
On your website, you will probably have your links/sponsors section at www.yourwebsite.com/links/ like the example screenshot https://desertsheepoutfitters.com/links/
You may or may not have links/sponsors built into your website - it depends on how your website is setup. However, you can use this links and sponsors area if you want to have your favorite links/logos/sponsors/etc, or just not use it.
To add a link go to Website > Links/Sponsors enter a URL and hit "Save".
Read MoreStill need help or don't want to DIY?
We have maintenance service and website update packages available. Please fill out a ticket and a 3plains representative will reach out to you with details on pricing and packages.
Last Updated: 2024-03-19
Back to Website Management